Continuing the theme or recycling and reusing plastic bags, this post is about fusing plastic bags with a household iron, to make a "fabric". Once fused the plastic is flexible and strong and can be stitched on, either by hand or by machine.
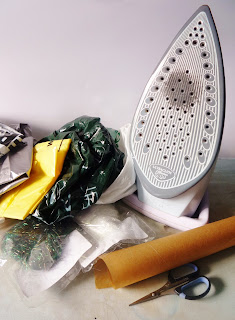
What you need
plastic bags (different weights and colours)
scissors
clothes iron
ironing board or heat resistant surface
baking parchment
angelina fibre fusible hot fix (optional)
photo or image
sewing machine (optional)
Method
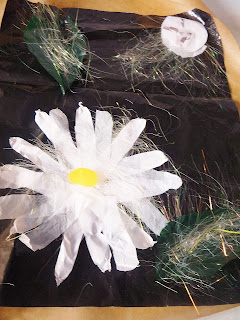
1. Find a suitable photo or image for inspiration.
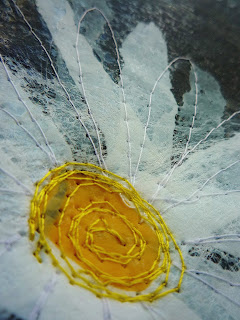
My photo was of Shasta daisies taken at night time.

5. Cut a second piece of baking parchment, also larger than the artwork and place on top, to form a sandwich.
6. Set the iron to synthetic or rayon and do not use the steam setting. If the iron is too hot the plastic will shrivel up and holes will develop.
7. Iron from the centre outwards, keep the iron moving for about 30 seconds.

8. Flip the whole thing over and repeat the ironing process.
9. Wait for the plastic to cool down before carefully removing the baking parchment.
DO NOT TOUCH PLASTIC WHILE IT IS STILL HOT
10. If the plastic is not totally fused repeat the ironing process.
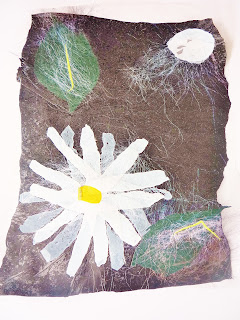
11. It is now possible to stitch, either by hand or machine to add definition to the picture. I stitched on top using free machine embroidery.

HEALTH AND SAFETY
When fusing the plastic bags do so in a well ventilated area and use appropriate breathing apparatus
What you need
plastic bags (different weights and colours)
scissors
clothes iron
ironing board or heat resistant surface
baking parchment
angelina fibre fusible hot fix (optional)
photo or image
sewing machine (optional)

Method
1. Find a suitable photo or image for inspiration.
My photo was of Shasta daisies taken at night time.

2. Cut a piece of baking parchment larger than the size the finished artwork will be and place on the ironing board.
3. Cut a piece of plastic for the background. Use a thick plastic bag or several layers of fine plastic bags.
4. Cut or tear pieces of different colours and weights of plastic bags and arrange on top of the background to form the picture. Place small amounts of Angelina fibre to add a bit of sparkle. For the flower and moon I used different weights of white plastic bag. It is possible to put a layer of clear plastic (such as a garment or dry cleaning bag) on top for added strength, but the final "fabric" will have a matte appearance.

5. Cut a second piece of baking parchment, also larger than the artwork and place on top, to form a sandwich.
6. Set the iron to synthetic or rayon and do not use the steam setting. If the iron is too hot the plastic will shrivel up and holes will develop.
7. Iron from the centre outwards, keep the iron moving for about 30 seconds.

8. Flip the whole thing over and repeat the ironing process.
9. Wait for the plastic to cool down before carefully removing the baking parchment.
DO NOT TOUCH PLASTIC WHILE IT IS STILL HOT
10. If the plastic is not totally fused repeat the ironing process.

The fine white plastic bags shrivelled up, but I quite liked the effect.
11. It is now possible to stitch, either by hand or machine to add definition to the picture. I stitched on top using free machine embroidery.


Brilliant Ali, what a great effect!
ReplyDeleteHappy weekend,
V x
I love it. What a great idea.
ReplyDeleteSarabeth
Life of an Agnostic Sunday School Teacher
Wow - that's stunning xx
ReplyDeleteGosh - didn't know this could be done! What a great effect you get with it. Maybe I'll have a go - will probably ruin the iron though. Still - don't use it much anyhow, so no worries there! xCathy
ReplyDeleteWow Ali thats really cool! The free embroidery really adds to the initial effect.
ReplyDeleteWe'll miss the humble plaggy bag when its extinct!
Ali x
What an amazing artwork! I love it - and the machine embroidery really makes it special. I'm going to start gathering up the plastic bags... Chrissie x
ReplyDeletewhat a fabulous idea! ive tried most things, but not this - its gorgeous
ReplyDelete